June 25, 2010

Embossing tutorial

I recently wrote a tutorial for the HandmadeMN blog and thought I'd re-post it here. Look out for a tutorial on chalk pastels coming soon!


A Drink from the Well: Embossing
This tutorial brought to you by Theresa B of Egret Effects

What You’ll Need:
Paper; scraps are fine
“Happy Birthday” stamp
Watermark stamp pad (this is basically a clear-ink pad)
Copper embossing powder (or color of your choice)
Heat tool
Cutting board (to place the hot heat tool on)
Window cleaner and cloth rag (to clean your stamp)


Step 1: Set yourself up
Place the paper on which you’re embossing over a larger scrap of paper. Open your embossing powder and stamp pad. Have your heat tool and stamp at the ready.


Step 2: Stamp and powder
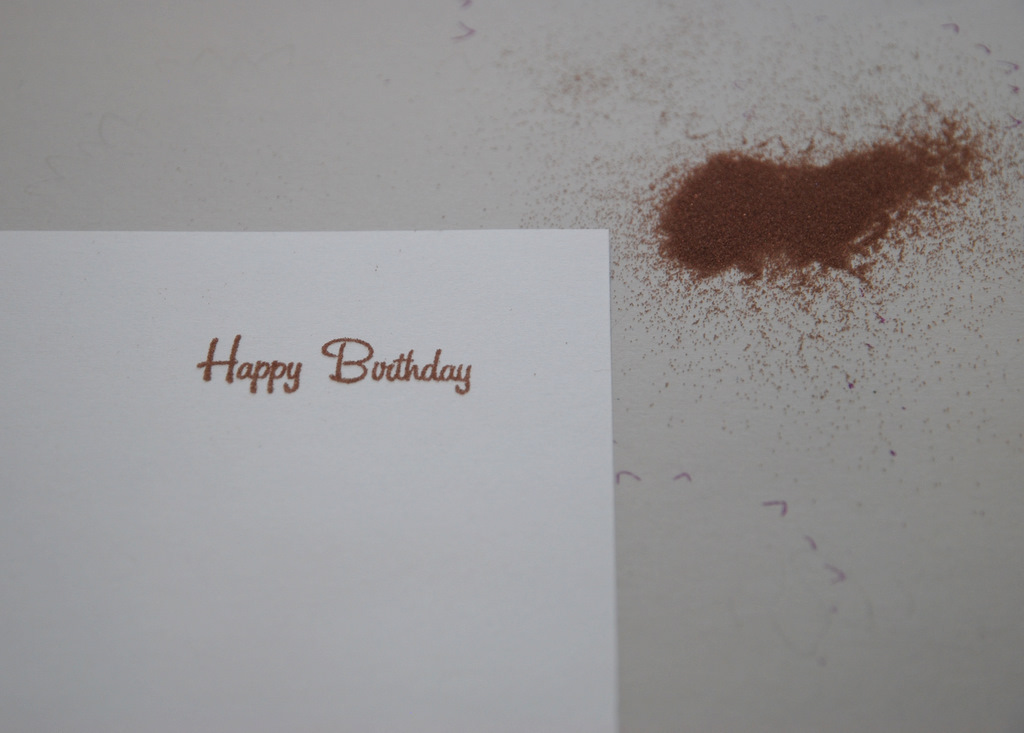
Apply the watermark ink to your stamp and stamp your paper. By moving the paper to reflect the light, you should be able to see your stamp and confirm that it’s a good one – all parts of the stamp made an impression and there are no extra marks.

Watermark ink doesn’t dry as fast as other inks, so while you don’t need to rush, you should sprinkle the embossing powder on as soon as you’ve verified the quality of the stamp. You don’t need much; just a light covering.


Step 3: Swirl, tap, and tidy
The embossing powder will stick to anything wet on your paper. Swirl it around gently so that it touches every area of your stamp; you’ll be able to see the message emerging. Once you’re sure the stamp is covered, tap the remaining loose powder onto the larger scrap paper. The powder on your stamp is secure enough to withstand a small breeze, but can still be smeared. Being careful not to touch the stamped area, set your powdered message aside and fold the paper with the loose powder in half so you can dump it back into the powder jar.

Before going any further, close your embossing powder jar. Heat tools not only get hot, they blow that hot air onto your project, and it would be pretty maddening if colored powder flew all over your desk/room/carpet – you get the idea. You might as well also eliminate loose papers hanging around. Speaking of which, if the paper you’re embossing on is small (say, smaller than 4x6) it might very well blow away, too. Use a needle-nosed pliers or other such instrument to secure the paper and keep your digits from burning.


Step 4: Heat and cool
If you don’t have a heat tool and don’t want to buy one, a hair dryer or toaster can substitute. Whatever you use, it’s a good idea to consider your first embossed stamp as a test. It’s common to see some paper warpage. Of course, if you heat the paper for too long it can get singed and discolored. We are dealing with a flammable product, so be careful!

That said, embossing is not hard. Just hold your heat tool about two or three inches up and directly over (or under, if using a toaster) the powdered stamp, moving back and forth slightly for about five to ten seconds. Embossing powder is basically tiny beads of plastic that, under the heat, melt together and grip the paper fibers. You’ll be able to see it happen right before your eyes! It only takes a few moments for the paper and newly-melted powder to cool; don’t touch it while still hot or you can smear the embossing (plus, no one wants melted plastic on their skin). Once cool, however, you have a durable, lovely embellishment to add texture to whatever special project you can come up with!


The finished product for this embellishment:


Embossing powder comes in all kinds of colors. Metalics are especially versatile; they show up nicely on most papers and can be paired with just about any color scheme.

For another look, use a colored ink pad with sparkly or “holographic” embossing powder, like this:


For a finished product of:


Happy embossing!

Wooly June

After several years of serious knitting, I think I finally understand something very important. You can't start mittens in January just because your hands are cold. Nor can you start a hat on, oh, December 22nd to give someone at Christmas, as if it won't take more than the two hours you might spend running to the store for a last-minute gift.


You have to have the foresight to start these projects early enough to allow for the relaxed, careful, and loving mindset with which they were meant to be made. So it's June, and it seems ever so wrong, but I've gotten out my wool blends and finished a couple of things with more time to spare than a half-day kindergartener.*


The mittens are for myself, to match my other winter warmies. The hat is for my dad. I was inspired on Father's Day to make it for him, which is just another indication that I tend to be a bit late to the party when it comes to having revelations.


Dad's been wearing the same stocking hat since sometime last century, but the real motivation was that he's so encouraging of my crafts. And not in a required-because-we're-family way. Sure, he's biased, but he's still sincere. So I made him a hat of mostly red, a color he looks smashing in, for the shoveling and car scraping and snowman making with the grandkids.


*I was going to go with a simile comparing my spare time with my grandmother sitting in a nursing home, but then thought that might be in poor taste.

June 21, 2010

Made in MN Blogventure Wednesday 2: Tools and Supplies of the Trade

It's not that I forgot about this little exercise, it's that I was out of town. Onward!

The premise:

This blogventure celebrates my favorite colors, blue and green, while paying homage to the awesomeness of the HandmadeMN members via Etsy treasuries. Each one features items from a particular crafting category as listed on the HandmadeMN blog. If you like the items, leave a comment on the treasury - comments will bump the treasury toward the top of the list so other folks are more likely to view it and give some love to these fabulous artists!

Some categories have just a few shops and others have so many that they'll cover more than one week; I want everybody to get fair attention, so you might see some random treasuries here and there. It'll take at least six months to get through all the HandmadeMN shops, so saddle up!


This week:

TOOLS AND SUPPLIES OF THE TRADE
featuring
Evie's Tool Emporium
Vintage Recreations

June 19, 2010

VACATION RECAP. Some things never change, but this is probably the first time cannibalism came into it.

To preface, my dad just retired from a long and glorious career as a journeyman meat cutter. There are many benefits to being the daughter of a meat cutter, and they include:

1. Inside knowledge of where your meat is coming from.
2. Perks from meat companies, such as our hotdog toaster and the baby-poop brown GoldnPlump hat with the yarn pompom on top.
3. Eligibility to rent one of the union's cabins on the shore of Lake Superior.


So every summer we (mom, dad, sister, me) drive up to Lutsen, MN for a week of good old fashioned tradition. As kids, my sister and I could bring up friends, or my grandma(s) would come along. Now we bring our husbands and kids and, like the circle of life, we pass our traditions on to the next generation. Only we can't go anymore once my dad is unable, which hopefully won't be for many years. So I guess it's more of an arc.

We always end up with an enormous number of pictures, so instead of wearing out your scrolling finger I've put together a brief slide show for you to view at your leisure. The quality, unfortunately, has been lost in translation, but you get the idea.


After nearly 30 years of making this pilgrimage to the woods, everything about it is nostalgic. Every year, we drive the same roads cut out of the rocky hillsides of Bob Dylan's Highway 61, on which there never fails to be a section down to one lane with yellow-vested construction workers wielding "stop" and "slow" signs to give each direction of traffic a go. The Duluth pine trees are joined by birches and stands of lupine as we drive past Two Harbors, past Beaver Bay, past Schroeder, past Tofte, finally down the dirt road and steep driveway to cabin #1.

It's often difficult to observe our myriad traditions while we're there amidst the cool breezes and wood smells, but we just. keep. trying.

To Do
get donuts from Tobies
make s'mores
play for the cribbage
trophy
eat at The Angry Trout
play Uno, Farkle, Yahtzee, and probably other board games
throw rocks into the lake with the kids
paint rocks with the kids
play on the swing set with the kids
argue about where to go on a hike
go on a hike
knit
ride the Alpine Slide (and stop in the gift shop)
shop the Grand Marais scene at least once
stop in "downtown Lutsen" at least 3 times
read
get free donuts from World's Best Donuts
throw more rocks with the kids
take the annual family picture in the middle of check-out chaos
stop ten minutes after leaving to go into a couple more shops (ie: the Tall Tale yarn shop!)
have lunch in Beaver Bay and visit the Agate Shop
part ways, but promise to call when we get home


These things never change. And what about the cannibalism, you ask? Here is the conversation I had with hubs one night while I was trying to read and he was trying to annoy chat with me...

Hubs: (while prodding the back of one of my knees) You know, I don't think men have this. The difference between men and women is that women have this meaty part.

Me: Did you just call me meaty?

Hubs: Just this part. So, you know, if you're ever in a situation where you have to cannibalize someone, you'll know who to go to first. (Demonstrating how this might go) 'Well, I guess we'll have to eat Jimmy.' 'No, no. Debbie.'

This is just the kind of relationship we have. We laughed because both my meaty and jiggly parts are hardly meaty or jiggly. Still, I make a habit of using these kinds of conversations to point out exactly what you should not say to your wife. Here's what happened the next day while he was giving me a hug and shaking me at the same time...

Me: Why are you making me jiggle?

Hubs: Why do you have jiggly parts?
*

Sigh. And so the birches have waned and the deciduous have ebbed. We are home from vacation and I'm glad, but I wish I had cleaned the house before we left.


* He could tell I had a retort for this, but I was holding back because it was mean. He told me to say it. So I said, "you're a bad husband." He laughed.

June 3, 2010

Vote! Vote! Vote!

Remember when I made Penny a sweater and it didn't fit so I made her another sweater?


Animal-lovers sent in their pet-related products/projects to Rita's Creative Nest, and she's taking votes to see who will get a feature on her blog. I'm hoping Penny can get me a win, but there is a pretty cute little Westie.... Regardless, it's a fun idea to give somebody's Etsy shop a little extra publicity, no? Polls close on Sunday, June 6, so go here to vote now!

June 2, 2010

Made in MN Blogventure Wednesday 1: Va-va-va-vintage

The premise:
This blogventure celebrates my favorite colors, blue and green, while paying homage to the awesomeness of the HandmadeMN members via Etsy treasuries. Each one features items from a particular crafting category as listed on the HandmadeMN blog. If you like the items, leave a comment on the treasury - comments will bump the treasury toward the top of the list so other folks are more likely to view it and give some love to these fabulous artists!

Some categories have just a few shops and others have so many that they'll cover more than one week; I want everybody to get fair attention, so you might see some random treasuries here and there. I estimate it will take about 30-35 weeks to get through all the HandmadeMN shops, so saddle up!


This week:

VA-VA-VA-VINTAGE
featuring
Retrovertigo
Ricks Relics
The Jewelry Chain
The Owl Shop

June 1, 2010

Made in MN

I've been looking for a blog project a la Julie and Julia, because it's fun to go on little adventures, and since creating my first two Etsy treasuries I feel like the fates have made the content decision for me.

Hot for Blue and Green and Sea Baby follow different themes, but similar colors. Blue and green are peaceful. They remind me of the cabin we go to every year on Lake Superior. Of course, going on those family vacations is not always relaxing; sometimes it's boring, sometimes it's annoying to share bathrooms (but at least we have them), and most of the time it's a pain to plan a week's worth of meals for eight people - including two picky kids. One year, there were worms hanging by silk strings from all the trees. Another year, I ran over a snake on the Alpine Slide.

But reminiscing about these vacations is generally much more romantic - roasting smores, playing cribbage on the porch, listening to the waves from bed. Playing bocce ball on the green grass that's stuccoed with tree roots. Skipping blue lake rocks into the blue harbor of Grand Marais. Yes, it can be quite idyllic.

So my first blogventure is going to celebrate blues and greens while paying homage to the awesomeness of the HandmadeMN members. Each treasury will feature items from a particular crafting category as listed on the HandmadeMN blog. First up: Va-va-va-vintage. Stay tuned!